Printfriendly

To kick off the Holiday Shopping Season, this Loom Knit Skinny Santa Scarf Pattern will be free from Black Friday until Christmas. It will be available on thismomentisgood.com. We will also be having a sale on all patterns on Black Friday and Cyber Monday...exciting stuff! Click here for the pattern:  Free Loom Knitting Pattern Here!
Happy Looming and Thanks for Reading!-Nicole


The Holidays are here! I thought I would kick off the season with a couple of Loom Knit Christmas Ornament Patterns. First, there's Ol' Saint Nicholas. He's a skinny style Santa with a bobble nose and bow mustache. Next, there's a cute christmas tree with a simple bobble to decorate its' top. Both ornaments are super quick and designed as stash busters. Only yarn weights are given so use whatever you have in your stash, get creative with your own yarn choices! I hope everyone enjoys these patterns and the upcoming holiday season. As always, happy Loom Knitting!-Nicole


Loom Knit Skinny Santa Ornament (free pattern)


Yarn
MC = White, Fuzzy # 5 yarn.
CC = Tan, # 5 or 2 strands #4.
CC1 =Red, #5 tweedy type yarn.
CC2 = Black sparkly, #4 weight

Loom = 3/8" peg spacing, any brand.

Key (both patterns)
ewk = e-wrap knit 
sts = Stitches
MB = Make Bobble. E-wrap knit peg 4 times, lift 1st e-wrap knit back up on to peg. (hint: it's helpful to place a stitch holder on the 1st e-wrap knit for easy lifting). e- wrap knit remaining sts together.
k2tog = Knit two together. Move the stitch from peg 1 to peg 2. Knit the sts together on peg 2. (decrease 1)
Ssk = Slip, slip knit. Move the stitch from peg 2 to peg 1. Knit the sts on peg 1 together. (decrease 1).

Beard
Foundation row:  E-wrap Cast on 1 peg with MC.
Row 1:  ewk
Row 2:  E-wrap cast on one peg, ewk to end, e-wrap cast on one empty peg (increase 2 sts)
Repeat rows 1 and 2 until there are (9) pegs with stitches on them.
Next 3 rows:  ewk
Next row:  K2tog, ewk to last 2 sts, ssk. (hint:  Just move your two end sts in by one, decrease 2 sts, 7 sts remaining on the loom).
Cut MC. Begin working with CC.

Santas Face
Rows 1-5:  U-Knit
Row 6:  U-knit 3, MB, u-knit 3.
Rows 7-9:  u-knit
Cut CC. Begin working with MC.

Santa's Hat
Rows 1-3:  e-wrap knit in MC.
Cut MC. Begin working with CC1.
Row 4:  Ewk
Row 5:  Purl
Rows 6-7:  Repeat rows 4-5 (1 time).
Row 8:  K2tog, ewk to last 2 sts, ssk.
Repeat rows 4-8 until there is only one stitch left on loom.
Next row:  Make Bobble using MC. Before binding off loom, tie CC1 and MC together.
Bind off.
Finish:  Weave in all ends. Use CC2 to make eyes above nose across 1 stitch. See picture for placement. Tie a bow under santa's nose for mustache, use MC. Tie a strand of CC1 to use as ornament holder to top back of ornament.

Loom Knit Christmas Tree Ornament (free pattern)


Yarn = #5 or #6 Bulky Weight, green.
Loom = 3/8" Peg spacing loom, any type.

Foundation row:  Chain CO 3 pegs with 1 strand yarn.
Row 1:  ewk
Row 2:  Purl
Row 3:  Ewk
Row 4:  Cast on 4 pegs, purl to end, Cast on 4 pegs. (any cast on method you like) [11 sts]
Row 5:  Ewk
Row 6:  purl
Row 7-8:  Repeat rows 5 and 6 (1 time).
Row 9:  Bind off 3 pegs, ewk to end, Bind off 3 pegs. [5 sts]
Row 10:  Purl
Row 11:  Cast on 2 pegs, ewk to end, cast on 2 pegs. [9 sts]
Row 12:  Purl
Rows 13:  Ewk
Row 14:  Purl
Row 15:  Bind off 3 pegs, ewk to end, Bind off 3 pegs. [3 sts]
Row 16:  Purl
Row 17:  Cast on 2 pegs, ewk to end, cast on 2 pegs. [7 sts]
Row 18:  Purl
Row 19:  K2tog, ewk to last 2 sts, ssk. [5 sts]
Row 20:  Purl
Row 21:  K2tog, ewk1, ssk. [3 sts]
Row 22:  Purl
Row 23:  K2tog, ssk. [1 st]
Create bobble at the top of the tree (see above).

Finish:  Weave in ends. Tie a strand of yarn at the top back of ornament as a hanger.


Happy Loom Knitting and Thanks For Reading!-Nicole

New pattern announcement for loom knitters!
Just listed, an adorable swaddler for the Holiday baby. This is a fun and quick loom knitting pattern set for newborn. It's extra special as it was designed for my grandbaby, who is due in December 2017. I can't wait to snuggle him in his new Santa suit. All details are listed below and you can find this pattern at thismomentisgood.com, Etsy or Ravelry-Nicole


Pattern Description
Adorable tweed Santa Cocoon and Elf Hat pattern for Newborn. This is a quick loom knit and would make a great gift for new parents expecting a baby before the holiday. This pattern is suitable for the confident beginner and above loom knitter who understands simple decreasing and pattern reading.

Loom Needed
Large gauge Looms with 3/4" peg spacing (plastic style like Knifty Knitter), 40/41 peg for cocoon and 30/31 peg for hat.

Level
Confident Beginner. Loomer must understand pattern reading and will be doing simple decreasing (all directions enclosed).

Thank you for Reading!-Nicole
Have you wanted to personalize your loom knitting but always wondered how?
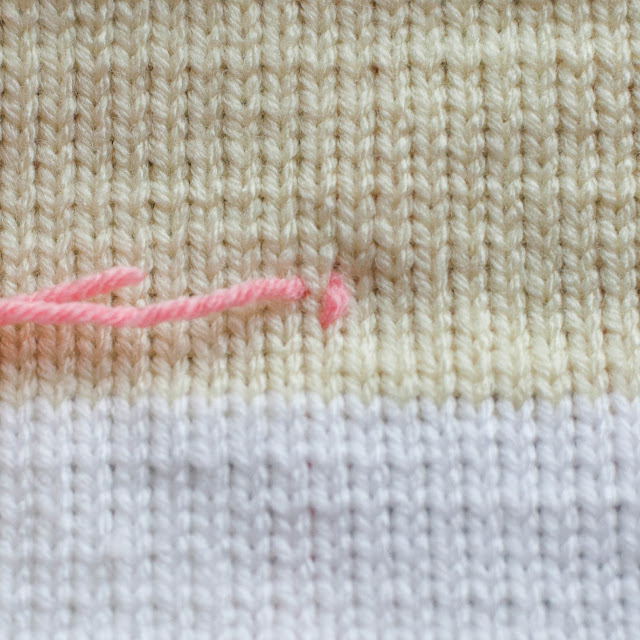
You can add lettering and pictures to stockinette with a method called duplicate stitch. Duplicate stitch does exactly what its' name describes, it duplicates the v's made by the knit stitch. It does take a little planning before you begin your loom knitting project. You'll want to make sure your project has an area of stockinette stitch (knit stitch). Do not use the twisted stockinette stitch (e-wrap knit). There are many free charts available online for lettering and little motifs. Get creative, it's fun!


How to duplicate stitch

1. Thread a tapestry needle with a long length of yarn.

2. Entering from back of knitting to front, bring your needle up through the bottom of the V. Then go up 1 stitch and bring your needle behind that stitch.

3. Pull the yarn completely through. You now have half of your V duplicated.

4.  Take your needle down through the bottom of the V (this is where you started).

You have now completed your duplicate stitch!

Things to remember about Duplicate Stitch!
  • Like all embroidery, it will stiffen the fabric up as it makes it double thick in those areas.
  • It is used on Stockinette Stitch, in loom knitting you may use the u-knit, flat knit or regular knit stitch.
  • Try to keep the back of your knitting as neat as possible if it will be seen (blankets, etc.)
  •  It's easy to accidentally split your yarn in the back of the knitting by taking your yarn through itself, try to avoid this as it will make it impossible to tighten your stitches and leave loops on the back.
  • You can do lettering or motifs, you can even incorporate cross stitch patterns, just use the duplicate stitch instead of x's in those blocks.
Thank you for reading, happy loom knitting!-Nicole

LOOM KNIT PET STOCKING PATTERN

We are offering this Loom Knit Pet Stocking Pattern Free to kick off the fall loom knitting season. It is being hosted on our sister site thismomentisgood.com. Read below for a description of this delightful loom knitting pattern and to find the link.
Loom Knit Pet Stocking Pattern
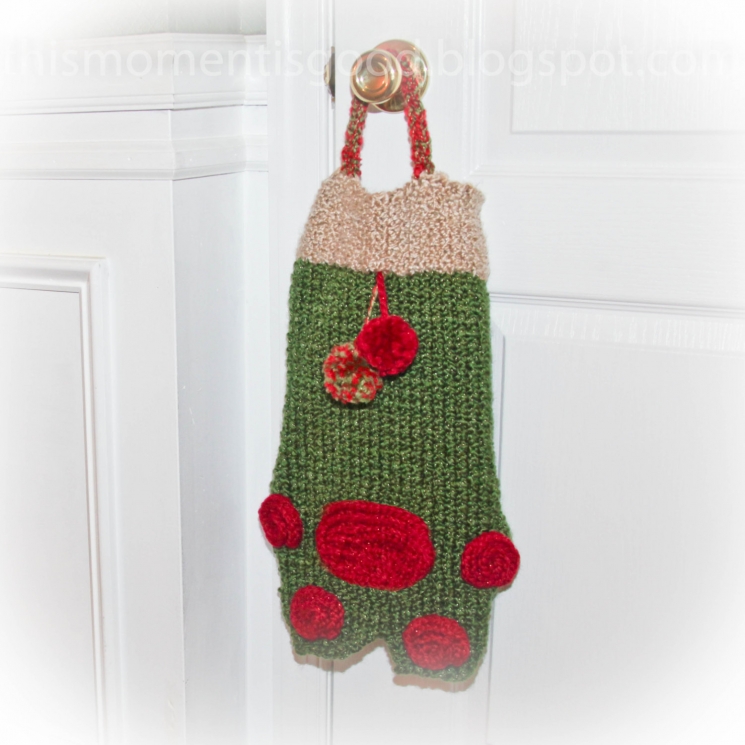
Free for a limited time Loom Knitting Pattern for a Paw Print Pet Stocking.  Once complete this pattern will make an adorable stocking for your favorite pet or a large bag for a child’s favorite things.  It would also make a great holiday sales item for your Christmas Craft Show.  This generously sized Stocking/Bag measures 18“ from top to bottom with another 4” for the handle.  It is  12“ wide at its widest point.  This PATTERN does require increasing/decreasing so it is best suited for the intermediate to advanced loom knitter.  
Happy Loom Knitting and, As Always, Thank You For Visiting!-Nicole
I think I have them all published now and I hope you enjoy all of my new loom knitting patterns for 2017. I tried to get them out as early as possible so that readers could make their project plans for fall. I hope everyone is enjoying their summer and I also hope to bring you a couple of free loom knitting patterns for this autumn knitting season soon! Until then please enjoy the many free patterns on this blog.


Thank you for reading. Happy loom knitting!-Nicole
I'm happy to say that we have several new babies coming this year in the family and with friends!
I'm going to be a grandmother for the first time also, which is very exciting. I have been spending most of my time designing patterns for babies. I have always loved the knitted crowns and set out to design a pattern for loom knitters. This little crown is knit in one piece and requires no seaming. There are only 15 rows to knit so it goes fast even though there are a lot of stitches to move to achieve the effect. I hope my readers enjoy this new pattern and can't wait to see all of the little babies in their homemade loom knit crowns.

Pattern description is available below.

#loomknitcrown #loomknittingpatterns #loomknitcrownpatteern #loomknitcrownheadband #loomknitheadband 


Pattern Description For The "Royal Crown Headband"
Perfect for the little Prince or Princess, this headband makes a cute ear warmer or photo prop. Although there is a lot of stitch movement in this piece, you’ll find that it works up quickly with only 15 rows. A natural fiber with elasticity, wool etc., is recommended to make movement of the sts easier and for blocking. The headband is loom knit in the round and requires no seaming! It is meant to be worn as a headband not sit on top of the head (picture is just to show stitching).

Level: Intermediate+

Finished Measurements: Size 0-6 mos., Fits 14-15” head circumference, height is 3 inches. When using wool this headband can be blocked to multiple sizes for infants. This Crown can easily be made in other sizes if desired (Children and adults, multiples are given). This is up to the loomer to change size and peg #'s. Note; if changing size, height is not adjustable.

Loom needed: 3/8” peg spacing loom, using 60 pegs. (KB, All in one knitting board, CinDWood makes this peg spacing)

Thank You For Reading. Happy Loom Knitting-Nicole
We have a new loom knitting pattern announcement!
A loom knit tunic pattern! This tunic has a relaxed, casual fit but is still refined enough to put over a casual dress or slacks. A confident beginner and up will be able to work through this pattern. I hope you enjoy-Nicole

You can find this pattern here...
It is also available on Etsy and Ravelry


 #loomknittunicpattern #loomknittoppattern #loomknitsweaterpattern #loomknittingpatterns #loomknitting #loomknittop #loomknitsweater #loomknitvestpattern #loomknitvest #loomknitponcho #patterns #loomknitpatterns #freeloomknittingpatterns

Thank you for reading and I hope you enjoy this new pattern for loom knitters!-Nicole
Etsy has launched a new way to buy craft supplies called Etsy Studio!
You can find our loom knitting patterns here...


As always we can still be found on regular Etsy, Ravelry and on www.thismomentisgood.com.
What are the differences between the four knit stitches?
Flat Knit (stockinette)
U-Knit (stockinette)
Regular Knit (stockinette)
E-Wrap Knit (twisted stockinette)
All of the samples above were knit using
12 stitches and 25 rows,
same loom and yarn.
Yet look at the size difference between the samples.
It's important to understand the differences between these very popular stitches.
Watch my video discussion here:

Thank you for visiting!-Nicole
I've released five new loom knit basket patterns this month. Baskets make a great home decor or gift project. All of these baskets feature flat bottoms and they stand upright even when empty. There is the owl basket, door knob basket, yarn basket, bread basket and a cute round basket with a fold over top. I hope you enjoy the latest additions to This Moment is Good!

#loomknitbasketpatterns #loomknittingpatterns #loomknitbreadbasket #loomknitroundbasket #loomknitdoorknobbasket #loomknityarnbasket #freeloomknittingpatterns #owlbasket #loomknitowlbasket

You can find the baskets here on Our WebsiteEtsy or on Ravelry. There are multiple ways to buy these patterns, depending on the site. Our website has the most options.

Loom Knit Owl Basket. This is a nice large basket!
Bread Basket, approx. 8" x 8". This basket would look great with a removable liner!
This yarn basket has a loop that opens and closes to hold a strand of yarn and allow for easy release. This basket can also be used for many other purposes.
1. Bread basket 2. Small round basket 3. Doorknob basket 4. Yarn basket
Thank You For Reading and Happy Loom Knitting!
Hello, today I worked on coming up with a pattern for this loom knit cat hat. Traditionally this hat is knit flat then seamed up the sides. It can be done that way on the loom also but I wanted to knit mine in the round. The seam will be at the top and not along the sides. I hope you enjoy this pattern!

#loomknitcathat #loomknitpussyhat #pussyhatproject #freepattern #freeloomknittingpatterns #freeloomkntihatpattern #loomknithat #loomknittingpatterns #womensmarch #getinvolved #knitintheround

Cat Hat Pattern

Supplies
  • Any round loom that will fit the recipients head.  This pattern was written for the 48 peg, 5/8" peg spacing round loom specifically (teen/adult size). It is easily modified to any round loom.
  • Knitting tool
  • Crochet hook
  • Yarn Needle
  • Yarn:  Any is ok with this pattern, Use desired weight/Color should be pink if using for the #pussyhatproject. Sample was knit with 2 strands Vanna's Colors by Lion Brand, Color #214, Geranium. #5 weight yarn. 2 strands used as one.

Pattern
Foundation round:  Chain CO all pegs; join to work in the round.
Rounds 1-6:  *K1, p1, repeat from * to end of round.
Round 7:  Knit (u-knit or regular knit)
Repeat round 7 until your hat reaches 8.5 inches (teen/adult). Add a quarter of an inch to the length of this hat if using mattress seam to close up hat...see below for other seaming method.

Take your knitting off the loom...
  • Cut 1 strand of yarn 4 inches long (this is only if using 2 strands as one, otherwise skip this step).
  • Wrap the other strand of yarn 3 times around the loom and cut.
  • Bind off using gather method and only one strand of yarn (cut the other tail to 4 inches). Do not gather knitting this is only being used as a lifeline to hold your sts.
  • Seam your hat using the method below. This method will give you a modified/easy version of the kitchener stitch, meaning your seam will have no bump but the loops will show a bit at the top (see pic above). I like this as it accents the ears. You may use any seaming method you desire. True kitchener or mattress seam will work also. 


Now...
1. Flatten the hat aligning stitches (front to back).


2. Take your yarn needle through the stitch on the back of the hat. Pointing the needle to the left through the loops.


3. Next, take your needle through the stitch on the front of the hat. Pointing the needle to the right. Repeat steps 2 and 3 until the hat is completely seamed. Weave in ends.
4. Place hat on your head and like magic, the ears will point out!

Links to the Pussy Hat Project
Women's March Philadelphia
Official Pussy Hat Project

Happy Loom Knitting and Thanks For Reading!


Hello, I've created an event page for my upcoming loom knitting workshop at Woolbearers. If you are able, please join us for a fun afternoon of learning this amazing craft.
Click the picture below!


OR click below for more info and sign up:
Loom Knitting Workshop Info/Sign up
Powered by Blogger.